
Showing posts with label JQuery. Show all posts

Monday, February 10, 2020

How using Ajax to Append Database Rows to HTML Tables with PHP

How using Ajax to Append Database Rows to HTML Tables with PHP

This is another post in PHP using Ajax. In this post, you will learn how to add the most recently inserted data to the HTML table using Ajax with PHP script. For this reason, we do not want to retrieve complete data from the mysql database table, convert it to an HTML table and display it on the website. In simple words, if you've used Ajax with PHP, what happens if you insert data with Ajax with PHP? In the PHP script, you first ran the insert query command, and then looked for data from the full MySQL table, converted to an HTML table, and returned to the Ajax request.

But if you used Ajax, why did you keep getting full data from the table every time you inserted data? However, add the most recently inserted data to the existing table. When your script has finished inserting data, the latest insert details are sent in JSON format to the Ajax request, and in the Ajax success function, the json data is converted to table row format and from using the prepend () method we add an HTML table. Therefore, the user completes the sent data that was stored in the database, and from the database, the data was displayed on the web in HTML table format.

Here we have a simple process of inserting data into the MySQL table using PHP with Ajax and here with jQuery, which contains a row of the Ajax response compilation table received in JSON format. Therefore, jQuery added the Ajax result to the existing table without updating the website. If you don't know how to add Ajax return data to the HTML table, your question will become clear in this post. You can append data using the jQuery prepend () method from the top of the table and the jQuery append () method at the end of the table. Below you will find the complete source code and the online demo.


Source Code


index.php


ect = new PDO("mysql:host=localhost;dbname=testing", "root", "");

$query = "SELECT * FROM tbl_sample ORDER BY id DESC";

$statement = $connect->prepare($query);

$statement->execute();

$result = $statement->fetchAll();

?>

<html>
 <head>
  <title>How to Use Ajax PHP to Append Last Inserted Data to HTML Tables | Using AJAX to append database rows to HTML tables</title>
  <link rel="stylesheet" href="https://maxcdn.bootstrapcdn.com/bootstrap/3.3.6/css/bootstrap.min.css" />
  <script src="https://ajax.googleapis.com/ajax/libs/jquery/2.2.0/jquery.min.js"></script>
  <script src="https://maxcdn.bootstrapcdn.com/bootstrap/3.3.6/js/bootstrap.min.js"></script>  
 </head>
 <body>
  <div class="container">
   <br />
   <br />
   <h2 align="center">How to Use Ajax PHP to Append Last Inserted Data to HTML Tables</h2><br />
   <h3 align="center">Add Details</h3>
   <br />
   <form method="post" id="add_details">
    <div class="form-group">
     <label>First Name</label>
     <input type="text" name="first_name" class="form-control" required />
    </div>
    <div class="form-group">
     <label>Last Name</label>
     <input type="text" name="last_name" class="form-control" required />
    </div>
    <div class="form-group">
     <input type="submit" name="add" id="add" class="btn btn-success" value="Add" />
    </div>
   </form>
   <br />
   <h3 align="center">View Details</h3>
   <br />
   <table class="table table-striped table-bordered">
    <thead>
     <tr>
      <th>First Name</th>
      <th>Last Name</th>
     </tr>
    </thead>
    <tbody id="table_data">
    <?php
    foreach($result as $row)
    {
     echo '
     <tr>
      <td>'.$row["first_name"].'</td>
      <td>'.$row["last_name"].'</td>
     </tr>
     ';
    }
    ?>
    </tbody>
   </table>
  </div>
 </body>
</html>

<script>
$(document).ready(function(){
 
 $('#add_details').on('submit', function(event){
  event.preventDefault();
  $.ajax({
   url:"insert.php",
   method:"POST",
   data:$(this).serialize(),
   dataType:"json",
   beforeSend:function(){
    $('#add').attr('disabled', 'disabled');
   },
   success:function(data){
    $('#add').attr('disabled', false);
    if(data.first_name)
    {
     var html = '<tr>';
     html += '<td>'+data.first_name+'</td>';
     html += '<td>'+data.last_name+'</td></tr>';
     $('#table_data').prepend(html);
     $('#add_details')[0].reset();
    }
   }
  })
 });
 
});
</script>


insert.php


<?php

//insert.php

$connect = new PDO("mysql:host=localhost;dbname=testing", "root", "");

$data = array(
 ':first_name'  => $_POST["first_name"],
 ':last_name'  => $_POST["last_name"]
); 

$query = "
 INSERT INTO tbl_sample 
(first_name, last_name) 
VALUES (:first_name, :last_name)
";

$statement = $connect->prepare($query);

if($statement->execute($data))
{
 $output = array(
  'first_name' => $_POST['first_name'],
  'last_name'  => $_POST['last_name']
 );

 echo json_encode($output);
}

?>

Thursday, February 6, 2020

Ajax AutoComplete Textbox With Image Using jQuery UI in PHP

Ajax AutoComplete Textbox With Image Using  jQuery UI  in PHP

If you are using PHP as web development and have created a PHP-based website, you need a search function on your website. If you have then added the search list for automatic completion in this "Search" text box and have another function such as displaying images with this automatic search list. For this reason, you are adding advanced features to your website's user interface.

Most websites generally displayed a text box with a name, email address, or plain text. However, there are only a few websites on which the previously completed search result contains a display image. Here we create a text box for autocomplete that creates a list of search results that have previously been populated with images. To do this, we add a custom HTML tag to the jQuery UI auto-completion method by adding _renderItem. Here we use the __renderItem method. With this method, we paste custom HTML into the autocomplete text box.

Using the jQery user interface, we can easily implement the autocomplete widget for all input text fields. This autocomplete widget offers us many customization options that meet our needs. So here we have to display the image with the search result. Therefore, this _renderItem method is provided, which allows us to define a custom HTML code to display the image in the search list for automatic suggestions.


This add-in for the automatic completion of the jQuery user interface can be very easily integrated into our existing code. With the simple autocomplete () method, we can initialize this add-in in any defined input text field element. This add-on used the Ajax request to get data from the PHP script. We have to define the name of the PHP file in the source option. If you send an Ajax request to a PHP script and receive a response from the PHP script in JSON format, the search result on the website is automatically suggested without the website being updated. Therefore, this autocomplete widget provides automatic suggestions as a search result that the user can see under the autocomplete text box while searching for a value in the text box element. You can then complete the source with the online demo link.


Database


--
-- Database: `testing`
--

-- --------------------------------------------------------

--
-- Table structure for table `tbl_student`
--

CREATE TABLE `tbl_student` (
  `student_id` int(11) NOT NULL,
  `student_name` varchar(250) NOT NULL,
  `student_phone` varchar(20) NOT NULL,
  `image` varchar(255) NOT NULL
) ENGINE=MyISAM DEFAULT CHARSET=latin1;

--
-- Dumping data for table `tbl_student`
--

INSERT INTO `tbl_student` (`student_id`, `student_name`, `student_phone`, `image`) VALUES
(1, 'Pauline S. Rich', '412-735-0224', 'image_1.jpg'),
(2, 'Sarah C. White', '320-552-9961', 'image_2.jpg'),
(3, 'Samuel L. Leslie', '201-324-8264', 'image_3.jpg'),
(4, 'Norma R. Manly', '478-322-4715', 'image_4.jpg'),
(5, 'Kimberly R. Castro', '479-966-6788', 'image_5.jpg'),
(6, 'Elaine R. Davis', '701-685-8912', 'image_6.jpg'),
(7, 'Concepcion S. Gardner', '607-829-8758', 'image_7.jpg'),
(8, 'Patricia J. White', '803-789-0429', 'image_8.jpg'),
(9, 'Michael M. Bothwell', '214-585-0737', 'image_9.jpg'),
(10, 'Ronald C. Vansickle', '630-571-4107', 'image_10.jpg'),
(11, 'Clarence A. Rich', '904-459-3747', 'image_11.jpg'),
(12, 'Elizabeth W. Peterson', '404-380-9481', 'image_12.jpg'),
(13, 'Renee R. Hewitt', '323-350-4973', 'image_13.jpg'),
(14, 'John K. Love', '337-229-1983', 'image_14.jpg'),
(15, 'Teresa J. Rincon', '216-394-6894', 'image_15.jpg'),
(16, 'Erin S. Huckaby', '503-284-8652', 'image_16.jpg'),
(17, 'Brian A. Handley', '989-304-7122', 'image_17.jpg'),
(18, 'Michelle A. Polk', '540-232-0351', 'image_18.jpg'),
(19, 'Wanda M. Brown', '718-262-7466', 'image_19.jpg'),
(20, 'Phillip A. Hatcher', '407-492-5727', 'image_20.jpg'),
(21, 'Dennis J. Terrell', '903-863-5810', 'image_21.jpg'),
(22, 'Britney F. Johnson', '972-421-6933', 'image_22.jpg'),
(23, 'Rachelle J. Martin', '920-397-4224', 'image_23.jpg'),
(24, 'Leila E. Ledoux', '615-425-9930', 'image_24.jpg'),
(25, 'Darrell A. Fields', '708-887-1913', 'image_25.jpg'),
(26, 'Linda D. Carter', '909-386-7998', 'image_26.jpg'),
(27, 'Melva J. Palmisano', '630-643-8763', 'image_27.jpg'),
(28, 'Jessica V. Windham', '513-807-9224', 'image_28.jpg'),
(29, 'Karen T. Martin', '847-385-1621', 'image_29.jpg'),
(30, 'Jack K. McDonough', '561-641-4509', 'image_30.jpg'),
(31, 'John M. Williams', '508-269-9346', 'image_31.jpg'),
(32, 'Amelia W. Davis', '347-537-8052', 'image_32.jpg'),
(33, 'Gertrude W. Lawrence', '510-702-7415', 'image_33.jpg'),
(34, 'Michael L. Harris', '252-219-4076', 'image_34.jpg'),
(35, 'Casey A. Groves', '810-334-9674', 'image_35.jpg'),
(36, 'James H. Wilson', '865-259-6772', 'image_36.jpg'),
(37, 'James A. Wesley', '443-217-1859', 'image_37.jpg'),
(38, 'Armando C. Gay', '716-252-9230', 'image_38.jpg'),
(39, 'James M. Duarte', '402-840-0541', 'image_39.jpg'),
(40, 'Jason E. West', '360-610-7730', 'image_40.jpg'),
(41, 'Gloria H. Saucedo', '205-861-3306', 'image_41.jpg'),
(42, 'Paul T. Moody', '914-683-4994', 'image_42.jpg'),
(43, 'Sandra L. Williams', '310-335-1336', 'image_43.jpg'),
(44, 'Elaine T. Deville', '626-513-8306', 'image_44.jpg'),
(45, 'Robyn L. Spangler', '754-224-7023', 'image_45.jpg'),
(46, 'Sam A. Pino', '806-823-5344', 'image_46.jpg'),
(47, 'Joseph H. Marble', '201-917-2804', 'image_47.jpg'),
(48, 'Mark M. Bassett', '206-592-4665', 'image_48.jpg'),
(49, 'Edgar M. Billy', '978-365-0324', 'image_49.jpg'),
(50, 'Connie M. Yang', '815-288-5435', 'image_50.jpg');

--
-- Indexes for dumped tables
--

--
-- Indexes for table `tbl_student`
--
ALTER TABLE `tbl_student`
  ADD PRIMARY KEY (`student_id`);

--
-- AUTO_INCREMENT for dumped tables
--

--
-- AUTO_INCREMENT for table `tbl_student`
--
ALTER TABLE `tbl_student`
  MODIFY `student_id` int(11) NOT NULL AUTO_INCREMENT, AUTO_INCREMENT=71;


index.php


<!DOCTYPE html>
<html>
  <head>
    <title>Ajax AutoComplete Textbox With Image Using  jQuery UI  in PHP</title>
    <script src="https://ajax.googleapis.com/ajax/libs/jquery/3.1.0/jquery.min.js"></script>
    <script src="https://cdnjs.cloudflare.com/ajax/libs/jqueryui/1.12.1/jquery-ui.js"></script>
    <link rel="stylesheet" href="https://cdnjs.cloudflare.com/ajax/libs/jqueryui/1.12.1/jquery-ui.css" />
    <link rel="stylesheet" href="https://maxcdn.bootstrapcdn.com/bootstrap/3.3.6/css/bootstrap.min.css" />
    <script src="https://maxcdn.bootstrapcdn.com/bootstrap/3.3.7/js/bootstrap.min.js"></script>

    <style type="text/css">
      .ui-autocomplete-row
      {
        padding:8px;
        background-color: #f4f4f4;
        border-bottom:1px solid #ccc;
        font-weight:bold;
      }
      .ui-autocomplete-row:hover
      {
        background-color: #ddd;
      }
    </style>
  </head>
  <body>
    <br />
    <br />
    <div class="container">
      <h3 align="center">Ajax AutoComplete Textbox With Image Using  jQuery UI  in PHP</h3>
      <br />
      <br />
      <br />
      <div class="row">
        <div class="col-md-3">

        </div>
        <div class="col-md-6">
          <input type="text" id="search_data" placeholder="Enter Student name..." autocomplete="off" class="form-control input-lg" />
        </div>
        <div class="col-md-3">

        </div>
      </div>
    </div>
  </body>
</html>
<script>
  $(document).ready(function(){
      
    $('#search_data').autocomplete({
      source: "fetch.php",
      minLength: 1,
      select: function(event, ui)
      {
        $('#search_data').val(ui.item.value);
      }
    }).data('ui-autocomplete')._renderItem = function(ul, item){
      return $("<li class='ui-autocomplete-row'></li>")
        .data("item.autocomplete", item)
        .append(item.label)
        .appendTo(ul);
    };

  });
</script>


fetch.php


<?php

//fetch.php;

if(isset($_GET["term"]))
{
 $connect = new PDO("mysql:host=localhost; dbname=testing", "root", "");

 $query = "
 SELECT * FROM tbl_student 
 WHERE student_name LIKE '%".$_GET["term"]."%' 
 ORDER BY student_name ASC
 ";

 $statement = $connect->prepare($query);

 $statement->execute();

 $result = $statement->fetchAll();

 $total_row = $statement->rowCount();

 $output = array();
 if($total_row > 0)
 {
  foreach($result as $row)
  {
   $temp_array = array();
   $temp_array['value'] = $row['student_name'];
   $temp_array['label'] = '<img src="images/'.$row['image'].'" width="70" />&nbsp;&nbsp;&nbsp;'.$row['student_name'].'';
   $output[] = $temp_array;
  }
 }
 else
 {
  $output['value'] = '';
  $output['label'] = 'No Record Found';
 }

 echo json_encode($output);
}

?>


Import CSV File Data With Progress Bar in PHP Using AJAX

 Import CSV File Data With Progress Bar in PHP Using AJAX

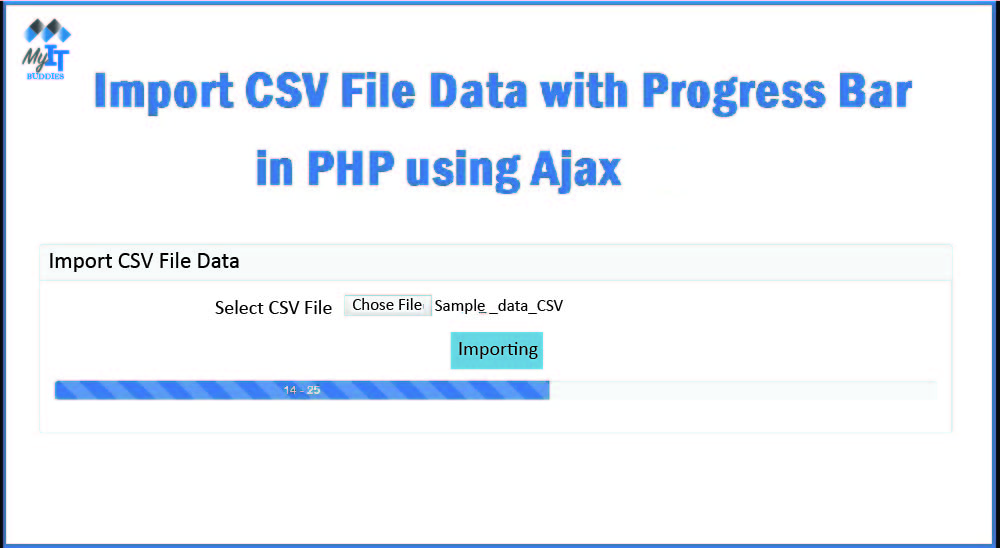
This is another post in the on-screen PHP script process in the progress bar using Ajax with jQuery. In this post we show the process of importing data from CSV files in the progress bar using Ajax-Jquery with PHP script. Or summarize the CSV import process using the Ajax progress bar.

Now you have a question: why do we want to show the process of importing data from CSV files in the progress bar? This is a very useful function to improve your user interface. If your CSV file contains large data to be imported into MySQL data, your PHP script will show a timeout error on the website. And it will be very difficult to import a large amount of data from CSV files into the MySQL database.

To solve this problem, we have created a PHP script here that fixes the problem of the PHP timeout error when importing a large CSV file. Because here we will import the data from the CSV file into the Mysql table step by step and show how much data is processed for the import, which we will display in the progress bar with Ajax with jQuery. When the user has imported the CSV file, you can see the process of importing data from the CSV file on the website in the form of a progress bar. This whole process is done without updating the website as we have used Ajax technology with jQuery here. Here we used the bootstrap library to create the progress bar.

There are many online tutorials that illustrate the process of loading files in the progress bar in the PHP script using Ajax. However, it is not searched for how the process of importing data from CSV files into the progress bar is displayed with Ajax jQuery in the PHP script. That is why we published this tutorial in which we explained how the process of importing MySQL data in real time is shown in the progress bar using Ajax with PHP. To create a real-time progress indicator in PHP using Ajax, we have divided this tutorial into the next part.


  • Upload a CSV file using Ajax and PHP
  • Start importing data from CSV files with Ajax
  • Use Ajax to display import data from CSV files in the progress bar


Using Ajax with PHP To Upload CSV File


Here we will first upload the CSV file to the server using PHP and Ajax. We can also retrieve data directly from the CSV file without loading it. Here, however, we want to show the import process in real time in the progress bar, so we first load the CSV file with Ajax on the server. The source code for loading CSV files with Ajax using PHP script can be found below.

index.php


<!DOCTYPE html>
<html>
 <head>
  <title> Import CSV File Data With Progress Bar in PHP Using AJAX </title>  
  <script src="https://ajax.googleapis.com/ajax/libs/jquery/3.1.0/jquery.min.js"></script>
  <link rel="stylesheet" href="https://maxcdn.bootstrapcdn.com/bootstrap/3.3.6/css/bootstrap.min.css" />
  <script src="https://maxcdn.bootstrapcdn.com/bootstrap/3.3.7/js/bootstrap.min.js"></script>
 </head>
 <body>
  
  <br />
  <br />
  <div class="container">
   <h1 align="center">Import CSV File Data With Progress Bar in PHP Using AJAX </h1>
   <br />
   <div class="panel panel-default">
    <div class="panel-heading">
     <h3 class="panel-title">Import CSV File Data</h3>
    </div>
      <div class="panel-body">
       <span id="message"></span>
       <form id="sample_form" method="POST" enctype="multipart/form-data" class="form-horizontal">
        <div class="form-group">
         <label class="col-md-4 control-label">Select CSV File</label>
         <input type="file" name="file" id="file" />
        </div>
        <div class="form-group" align="center">
         <input type="hidden" name="hidden_field" value="1" />
         <input type="submit" name="import" id="import" class="btn btn-info" value="Import" />
        </div>
       </form>
       <div class="form-group" id="process" style="display:none;">
        <div class="progress">
         <div class="progress-bar progress-bar-striped active" role="progressbar" aria-valuemin="0" aria-valuemax="100">
          <span id="process_data">0</span> - <span id="total_data">0</span>
         </div>
        </div>
       </div>
      </div>
     </div>
  </div>
 </body>
</html>

<script>
 
 $(document).ready(function(){

  var clear_timer;

  $('#sample_form').on('submit', function(event){
   $('#message').html('');
   event.preventDefault();
   $.ajax({
    url:"upload.php",
    method:"POST",
    data: new FormData(this),
    dataType:"json",
    contentType:false,
    cache:false,
    processData:false,
    beforeSend:function(){
     $('#import').attr('disabled','disabled');
     $('#import').val('Importing');
    },
    success:function(data)
    {
     if(data.success)
     {
      $('#total_data').text(data.total_line);

      $('#message').html('<div class="alert alert-success">CSV File Uploaded</div>');
     }
     if(data.error)
     {
      $('#message').html('<div class="alert alert-danger">'+data.error+'</div>');
      $('#import').attr('disabled',false);
      $('#import').val('Import');
     }
    }
   })
  });

 });
</script>


upload.php


<?php

//upload.php

if(isset($_POST['hidden_field']))
{
 $error = '';
 $total_line = '';
 session_start();
 if($_FILES['file']['name'] != '')
 {
  $allowed_extension = array('csv');
  $file_array = explode(".", $_FILES["file"]["name"]);
  $extension = end($file_array);
  if(in_array($extension, $allowed_extension))
  {
   $new_file_name = rand() . '.' . $extension;
   $_SESSION['csv_file_name'] = $new_file_name;
   move_uploaded_file($_FILES['file']['tmp_name'], 'file/'.$new_file_name);
   $file_content = file('file/'. $new_file_name, FILE_SKIP_EMPTY_LINES);
   $total_line = count($file_content);
  }
  else
  {
   $error = 'Only CSV file format is allowed';
  }
 }
 else
 {
  $error = 'Please Select File';
 }

 if($error != '')
 {
  $output = array(
   'error'  => $error
  );
 } 
 else
 {
  $output = array(
   'success'  => true,
   'total_line' => ($total_line - 1)
  );
 }

 echo json_encode($output);
}

?>


Start Import CSV file data using Ajax


As soon as the CSV file has been saved in the folder, we would like to start importing the CSV data into the MySQL database. To start importing data from the CSV file, we used the Ajax request here, which is activated after the CSV file has been loaded successfully. The Ajax request is then sent to the PHP script to read the data from the CSV file and to start the import into the Mysql table.


index.php


<!DOCTYPE html>
<html>
 <head>
  <title> Import CSV File Data With Progress Bar in PHP Using AJAX</title>  
  <script src="https://ajax.googleapis.com/ajax/libs/jquery/3.1.0/jquery.min.js"></script>
  <link rel="stylesheet" href="https://maxcdn.bootstrapcdn.com/bootstrap/3.3.6/css/bootstrap.min.css" />
  <script src="https://maxcdn.bootstrapcdn.com/bootstrap/3.3.7/js/bootstrap.min.js"></script>
 </head>
 <body>
  
  <br />
  <br />
  <div class="container">
   <h1 align="center">Import CSV File Data With Progress Bar in PHP Using AJAX</h1>
   <br />
   <div class="panel panel-default">
    <div class="panel-heading">
     <h3 class="panel-title">Import CSV File Data</h3>
    </div>
      <div class="panel-body">
       <span id="message"></span>
       <form id="sample_form" method="POST" enctype="multipart/form-data" class="form-horizontal">
        <div class="form-group">
         <label class="col-md-4 control-label">Select CSV File</label>
         <input type="file" name="file" id="file" />
        </div>
        <div class="form-group" align="center">
         <input type="hidden" name="hidden_field" value="1" />
         <input type="submit" name="import" id="import" class="btn btn-info" value="Import" />
        </div>
       </form>
       <div class="form-group" id="process" style="display:none;">
        <div class="progress">
         <div class="progress-bar progress-bar-striped active" role="progressbar" aria-valuemin="0" aria-valuemax="100">
          <span id="process_data">0</span> - <span id="total_data">0</span>
         </div>
        </div>
       </div>
      </div>
     </div>
  </div>
 </body>
</html>

<script>
 
 $(document).ready(function(){

  var clear_timer;

  $('#sample_form').on('submit', function(event){
   $('#message').html('');
   event.preventDefault();
   $.ajax({
    url:"upload.php",
    method:"POST",
    data: new FormData(this),
    dataType:"json",
    contentType:false,
    cache:false,
    processData:false,
    beforeSend:function(){
     $('#import').attr('disabled','disabled');
     $('#import').val('Importing');
    },
    success:function(data)
    {
     if(data.success)
     {
      $('#total_data').text(data.total_line);

      start_import();

      //$('#message').html('<div class="alert alert-success">CSV File Uploaded</div>');
     }
     if(data.error)
     {
      $('#message').html('<div class="alert alert-danger">'+data.error+'</div>');
      $('#import').attr('disabled',false);
      $('#import').val('Import');
     }
    }
   })
  });

  function start_import()
  {
   $('#process').css('display', 'block');
   $.ajax({
    url:"import.php",
    success:function()
    {

    }
   })
  }

 });
</script>


import.php


<?php

//import.php

header('Content-type: text/html; charset=utf-8');
header("Cache-Control: no-cache, must-revalidate");
header ("Pragma: no-cache");

set_time_limit(0);

ob_implicit_flush(1);

session_start();

if(isset($_SESSION['csv_file_name']))
{
 $connect = new PDO("mysql:host=localhost; dbname=testing", "root", "");

 $file_data = fopen('file/' . $_SESSION['csv_file_name'], 'r');

 fgetcsv($file_data);

 while($row = fgetcsv($file_data))
 {
  $data = array(
   ':first_name' => $row[0],
   ':last_name' => $row[1]
  );

  $query = "
  INSERT INTO tbl_sample (first_name, last_name) 
     VALUES (:first_name, :last_name)
  ";

  $statement = $connect->prepare($query);

  $statement->execute($data);

  sleep(1);

  if(ob_get_level() > 0)
  {
   ob_end_flush();
  }
 }

 unset($_SESSION['csv_file_name']);
}

?>


Using Ajax to Display Import CSV File Data on progress bar


As soon as the CSV file is loaded and the import of data from the CSV file into the MySQL database begins, the question arises how the process of importing CSV data should be shown in the progress bar. For this, too, we continuously send the Ajax request to Fetech as to how much data is processed based on the progress bar of this number, which the data import process shows. A request to retrieve the number of data processed is continuously sent until all data has been imported into the mysql table. We used jQuery setInterval () and the callback function clearInterval () for this. Csv" here.


index.php


<!DOCTYPE html>
<html>
 <head>
  <title>Import CSV File Data With Progress Bar in PHP Using AJAX </title>  
  <script src="https://ajax.googleapis.com/ajax/libs/jquery/3.1.0/jquery.min.js"></script>
  <link rel="stylesheet" href="https://maxcdn.bootstrapcdn.com/bootstrap/3.3.6/css/bootstrap.min.css" />
  <script src="https://maxcdn.bootstrapcdn.com/bootstrap/3.3.7/js/bootstrap.min.js"></script>
 </head>
 <body>
  
  <br />
  <br />
  <div class="container">
   <h1 align="center">Import CSV File Data With Progress Bar in PHP Using AJAX </h1>
   <br />
   <div class="panel panel-default">
    <div class="panel-heading">
     <h3 class="panel-title">Import CSV File Data</h3>
    </div>
      <div class="panel-body">
       <span id="message"></span>
       <form id="sample_form" method="POST" enctype="multipart/form-data" class="form-horizontal">
        <div class="form-group">
         <label class="col-md-4 control-label">Select CSV File</label>
         <input type="file" name="file" id="file" />
        </div>
        <div class="form-group" align="center">
         <input type="hidden" name="hidden_field" value="1" />
         <input type="submit" name="import" id="import" class="btn btn-info" value="Import" />
        </div>
       </form>
       <div class="form-group" id="process" style="display:none;">
        <div class="progress">
         <div class="progress-bar progress-bar-striped active" role="progressbar" aria-valuemin="0" aria-valuemax="100">
          <span id="process_data">0</span> - <span id="total_data">0</span>
         </div>
        </div>
       </div>
      </div>
     </div>
  </div>
 </body>
</html>

<script>
 
 $(document).ready(function(){

  var clear_timer;

  $('#sample_form').on('submit', function(event){
   $('#message').html('');
   event.preventDefault();
   $.ajax({
    url:"upload.php",
    method:"POST",
    data: new FormData(this),
    dataType:"json",
    contentType:false,
    cache:false,
    processData:false,
    beforeSend:function(){
     $('#import').attr('disabled','disabled');
     $('#import').val('Importing');
    },
    success:function(data)
    {
     if(data.success)
     {
      $('#total_data').text(data.total_line);

      start_import();

      clear_timer = setInterval(get_import_data, 2000);

      //$('#message').html('<div class="alert alert-success">CSV File Uploaded</div>');
     }
     if(data.error)
     {
      $('#message').html('<div class="alert alert-danger">'+data.error+'</div>');
      $('#import').attr('disabled',false);
      $('#import').val('Import');
     }
    }
   })
  });

  function start_import()
  {
   $('#process').css('display', 'block');
   $.ajax({
    url:"import.php",
    success:function()
    {

    }
   })
  }

  function get_import_data()
  {
   $.ajax({
    url:"process.php",
    success:function(data)
    {
     var total_data = $('#total_data').text();
     var width = Math.round((data/total_data)*100);
     $('#process_data').text(data);
     $('.progress-bar').css('width', width + '%');
     if(width >= 100)
     {
      clearInterval(clear_timer);
      $('#process').css('display', 'none');
      $('#file').val('');
      $('#message').html('<div class="alert alert-success">Data Successfully Imported</div>');
      $('#import').attr('disabled',false);
      $('#import').val('Import');
     }
    }
   })
  }

 });
</script>


process.php


<?php

//process.php

$connect = new PDO("mysql:host=localhost; dbname=testing", "root", "");

$query = "SELECT * FROM tbl_sample";

$statement = $connect->prepare($query);

$statement->execute();

echo $statement->rowCount();

?>


This tutorial is for learning purposes. You must make the necessary changes according to your requirements. Above is a complete step-by-step guide on how to import CSV file data into the progress bar using a PHP script with Ajax jQuery Bootstrap and the MySQL database.